 Banking Software Development
 Our Work Process
 Awards


If you are wondering how to submit app to app store, you are in the right place.
After iOS app development, submitting an app can be a daunting task but it’s not as complicated as it’s been said either. You have committed long hours and many sleepless nights to develop an app, lots of work for designing and testing. Phew! When you think yeah we have made it that’s when the real struggles start. After long hours of testing, fixing errors and bugs, and one silly error that can cost a thousand bucks, your app will get rejected.
Oh, wait struggle never ends it just revolves around it. Rejection can be daunting for developers and frustrating at the same time. So avoid these circumstances we are here to help you, to take your app to the next level and reach millions of users through the app store!
In this blog, we will discuss and provide you with a step-by-step guide that helps you submit your app to the app store.
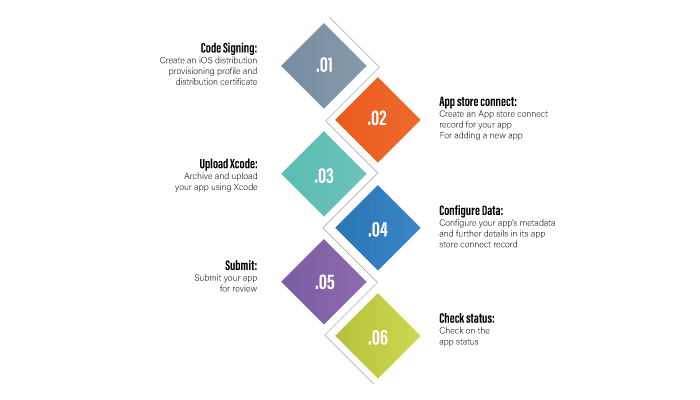
Submit Your App To The App Store: Step-By-Step Guide
Submitting your app to the Apple App Store, can be a little different from publishing App on Google Play Store for obvious reasons.
But if you are done with iOS app development and ready to launch your app, worry not. Because we shall be discussing the entire process to do so here. Let’s get right into it, starting with the first step.
1. Code Signing: Create an iOS distribution provisioning profile and distribution certificate
To distribute an app to the beta testers, you’ll need to create a distribution provisioning profile and a distribution certificate. For creating a distribution provisioning profile and certificate using Xcode, you can enable automatic signing. With Xcode submit app to app store easily.
This feature will handle the creation and management of certificates, signing identities, and device registration for you.
If automatic signing is enabled, you can skip to the next step. However, if you prefer manual signing, you can follow a detailed tutorial to manually sign your app.
- Now, add a developer program account to Xcode, open Xcode, and go to preferences from the top menu.
- Click on the accounts tab and then press the + sign at the bottom left corner of the window.
- Select “Add Apple ID” and enter your Apple ID password used for the Apple Developer program. Then, click on “Sign in.”
- After your account is added, select a target from the Project Editor and click on General
- Scroll down to the Signing section and expand the settings by clicking on the triangle icon.
- Check the box next to “Automatically manage to sign “and select your team.
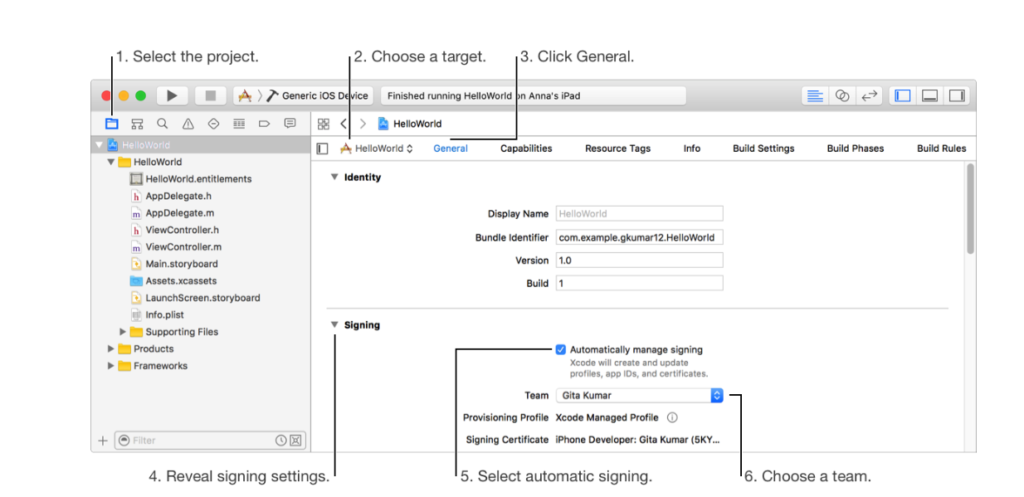
Xocde will automatically register when you connect a new device to the Mac. To launch your app on a device, the device needs to be registered on your team provisioning profile.
If you want to learn more about how to create iOS developer account, you can read it here.
2. Create an App Store connect record for your app
Before you submit ios app to app store creating an app store connect record is an important step in getting your app ready for distribution. Here’s what you need to do:
- Get an App Store to connect account by creating your own organization or being invited by an existing organization.
- If you are submitting a paid app, you’ll need to sign a contract that covers the terms of payment. You can do this by clicking on Agreements, Tax, and Banking on the App store connects dashboard and following the instructions.
- Click on Request under, Request Contracts.
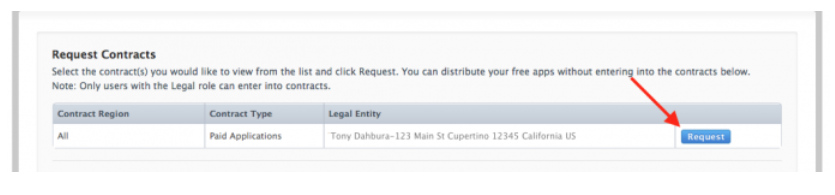
- Check the agreement and check the box to agree and click on Submit.
- After that contract in Process, click Set UP in the contact Info column.

- Now, a window will appear, click on Add New Contact and enter your information.
- In the bank info column, click SETUP then Add Bank Account and follow the directions to save your account info.
- In the TAX Info column, click SETUP and fill in the information. And set up other necessary country forms.
- After completing the above process, the contract status will now say Processing. After being verified by Apple, the contract will appear under, Contracts in Effect.

For adding a new app
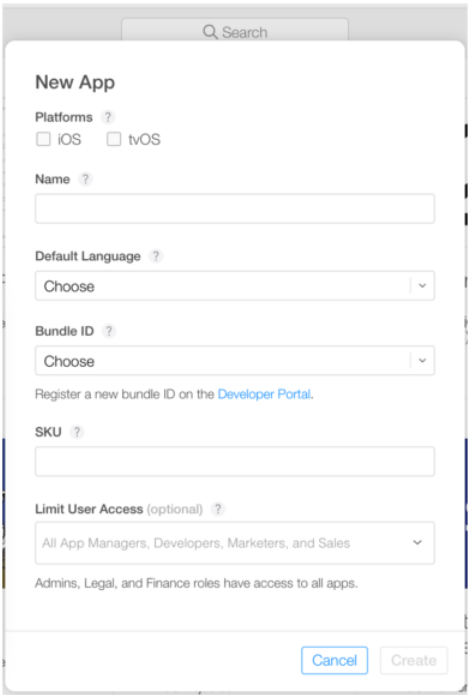
- Once you have your account set up, you can add a new app by selecting My Apps from the App store connect dashboard and clicking on the + sign upper left corner, then NEW APP
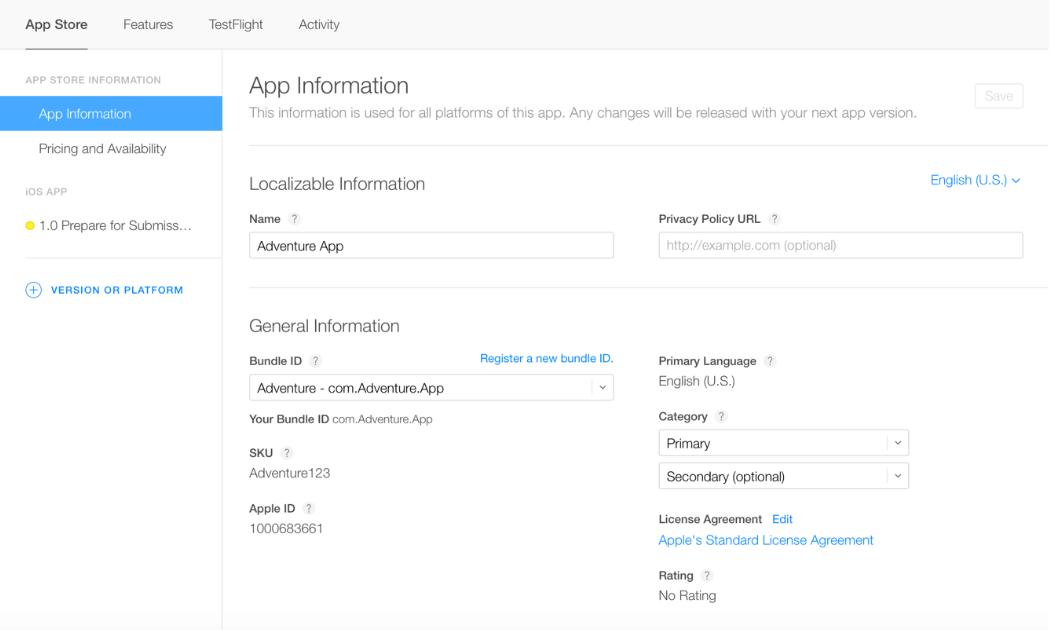
After that, enter the required details for your app, including the platform, app name, default language, bundle ID, and SKU.
- Make sure to use keywords in your app name to optimize for discovery.
- Ensure that the bundle ID is an exact match of the bundle identifier in your Xcode project info.plist file.( in the target’s General> Identity section).
Plus, you can set up user access at this step if needed.
By following these steps, you‘ll able to create an Apple Store connect record for your app and get it ready for distribution to users. Now we are one more step closer to submitting the app to the app store.
3. Archive and upload your app using Xcode
To submit app to App Store, you first need to upload your app’s build from Xcode. Here are the steps:
- Open your Xcode project and choose “Generic iOS device” as your deployment target.
- Go to the “Product” menu and click “Archive”.
- The Xcode Organizer will appear, showing any archives you have created in the past.
- Select the current build of your app and click “Upload to App Store” in the right-hand panel.
- Choose your credentials ( Apple ID and Password) and click “ Choose”.
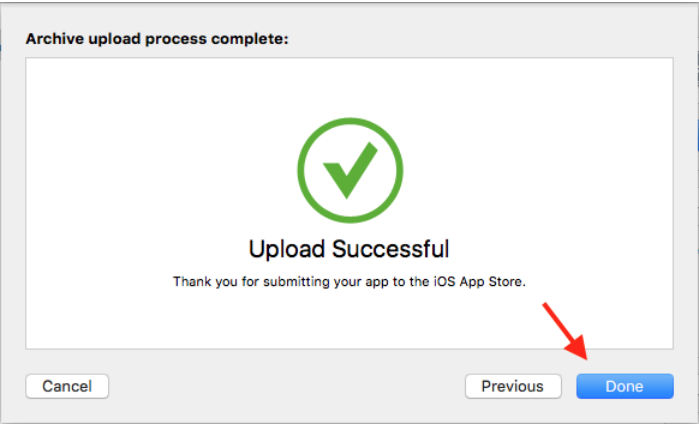
- In the next window that appears, click “ Upload” in the bottom right-hand corner.
- Wait for the upload to complete, and a success message will appear.
- Click “ Done” to finish.
That’s it! Your app is now uploaded to the App Store for review. If you want to submit flutter app to app store, you have to follow same steps.
4. Configure your app’s metadata and further details in its app store connect record
When you are preparing to submit app to App Store there are several steps that you’ll need to complete in App store connect. Follow these steps to submit app to app store and here is how to add screenshots:
- Go to the “App Store” tab in App Store Connect and select your app.
- On the pricing and availability page, you need to set the price for your app. You can either make it free or choose a price tier.
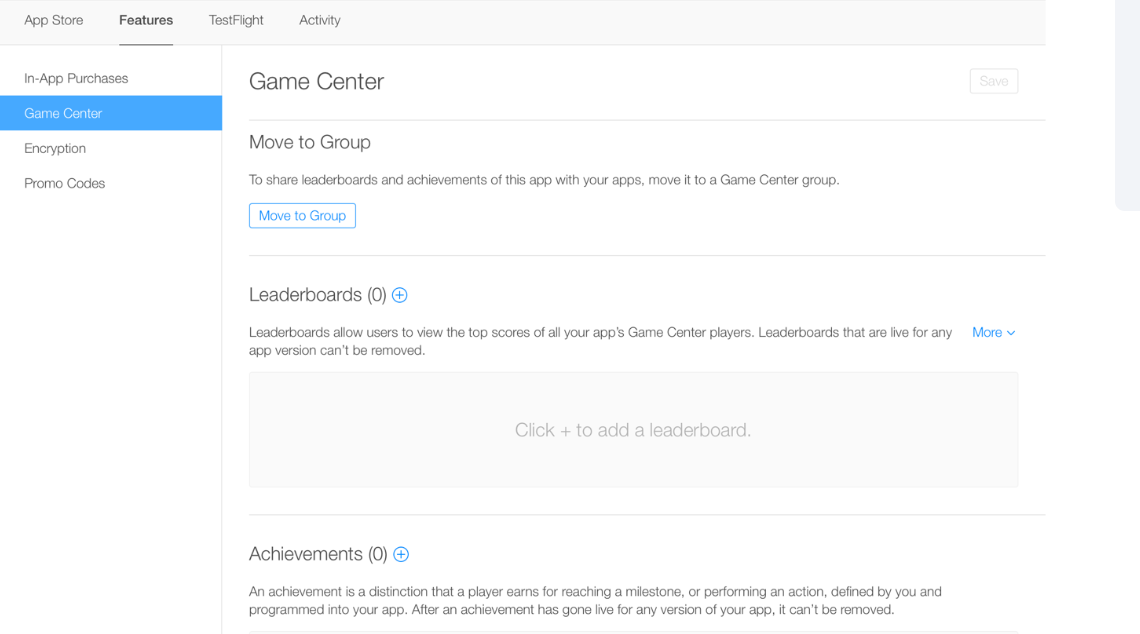
- Under the features tab, you can customize your app’s behavior with App Store technologies like Game Center and in-app purchases. This allows you to add special features to your app or monetize it through in-app purchases.
- After completion, now prepare your app for submission on the App Store. It will be marked with a yellow dot and the status “Prepare for Submission” in App Store Connect.
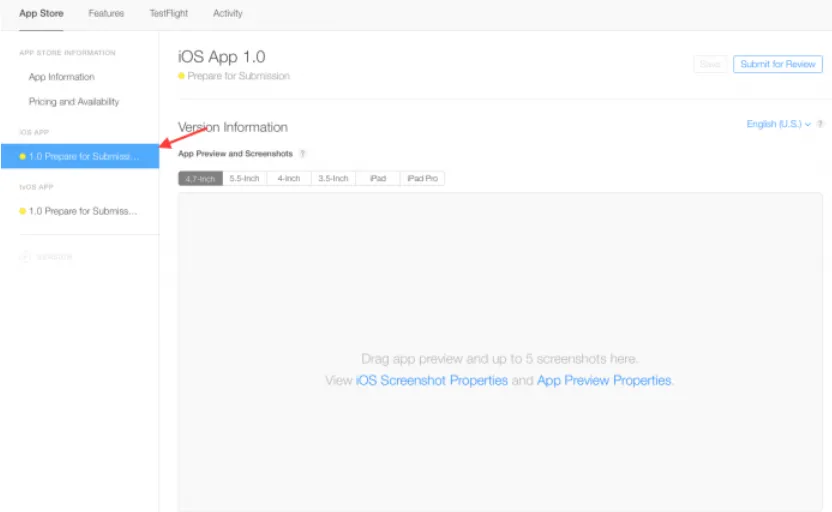
- Now select the build you want to configure and add the information for your product page on the app store.

- Now upload your app screenshots( JPEG or PNG format without a status bar). For one device and use them for all other sizes to save time.
- Now click on the “Save” button located in the upper right-hand corner of the window.
As continuing configuring your app’s product page on the App Store. You’ll need to scroll down and enter some important information, including your app’s description, keywords, support URL, and marketing URL.
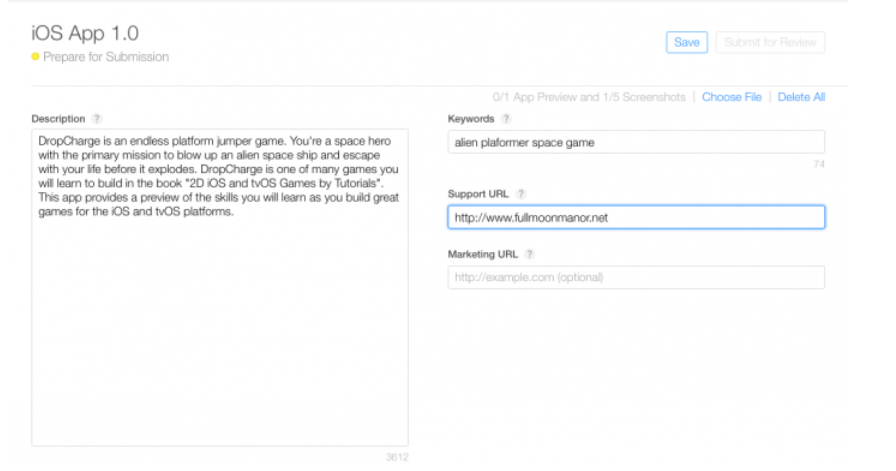
- App description and keywords are crucial so choose relevant and accurate keywords.
- The supported URL is a simple landing page where users contact regarding any issue.
- Marketing URL is optional and it’s usually your app’s website.
General App Information
In the “General App Information” section, you need to upload your app’s icon. And provide some important details such as its version number, copyright, and contact information.
- Your app’s icon should be 1024 x 1024 pixels, make this appealing as it is the first thing that users will see on the App Store.
- Version, the number should exactly match the one in Xcode
- Now the copyright info typically looks like this: Copyright © 2017, Instabug, Inc.
- In addition, you need to provide contact information that will be displayed to users. This can be an email address, phone number, or website where users can contact you.
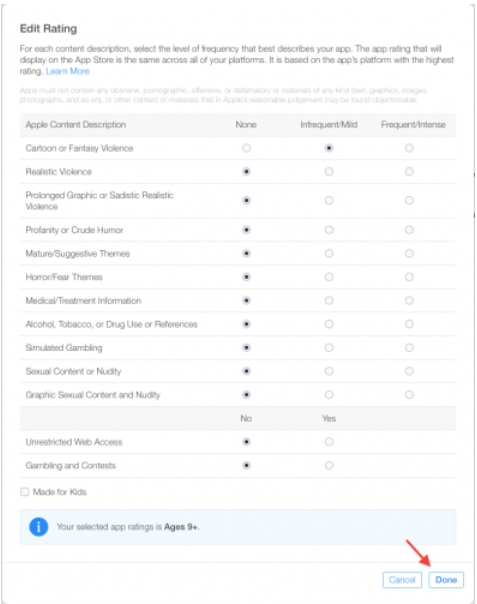
- Finally, when setting up your app rating be honest. As while reviewing your app can get rejected if doesn’t match its rating.
App Review Information
In the “ App Review Information “ section, provide your contact information and additional notes for the reviewer. And set the version release date as automatic for the first releases.
- Click “Save” in the top right-hand corner to save your changes.
- Once you have completed these you are almost ready to submit your app for review.
- When releasing for the first time, you should typically leave the version release date as automatic.
- Now, click on Save in the Top right-hand corner. Now you are ready to “Submit for Review”.
5. Submit your app for review
You can now submit app on app store by following the steps down below:
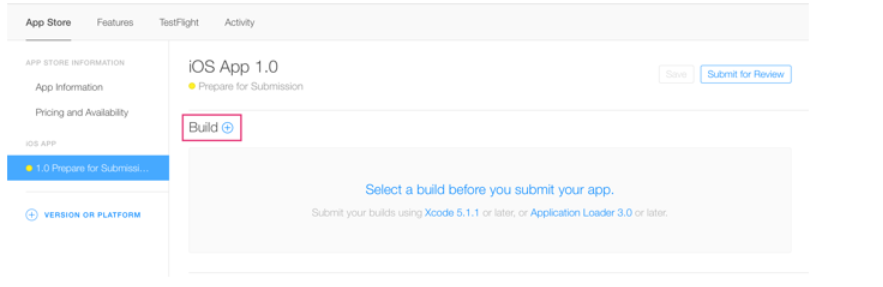
- Scroll to the “Build” section in your app’s App Store connect record.
- Now, click on “Select a build before you submit your app”.
- It’s time to choose the app you uploaded with Xcode. Click on “Done” in the bottom right-hand corner.
- Then “Save “in the top right-hand corner and Submit for review.
Lastly, answer the Export Compliance, content rights, and advertising identifier questions and click on “Submit.”
That’s it! Now, wait for your app review.
6. Check on the app status
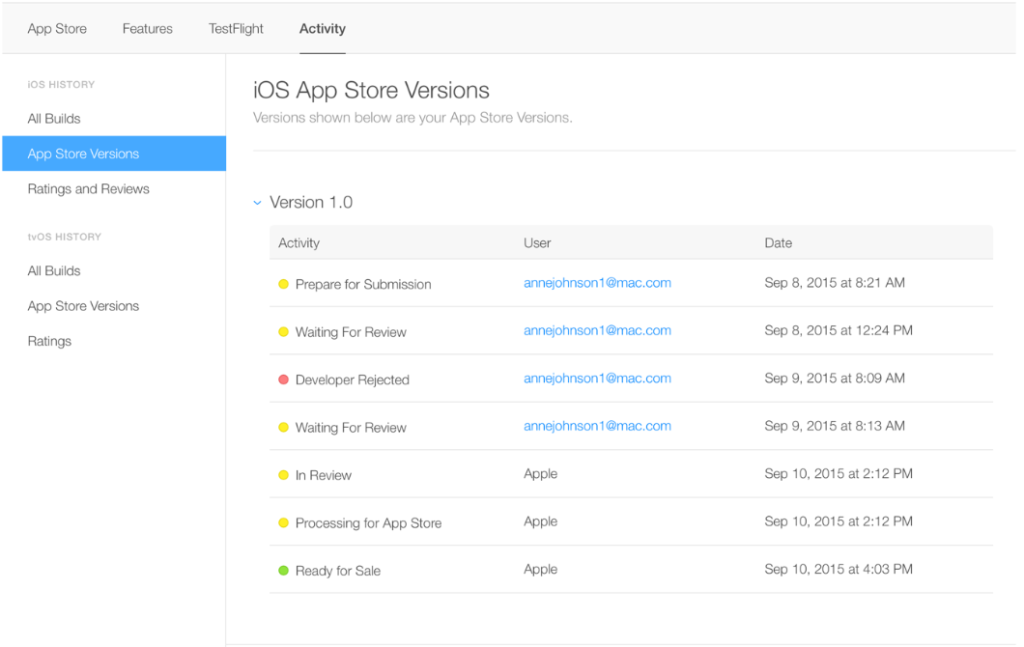
In-App Store Connect, select Activity in the top horizontal menu, then App Store Versions in the left-hand panel.
How long does it take to get App Store approval?

The time it takes for Apple to review and approve an app submission can vary depending on several factors, including the complexity of the app. The completeness of the submission and the current volume of submissions being processed. If you find these steps difficult you can hire mobile app developers.
However, on average, the App Store review process can take anywhere from two to ten business days. It is important to note that this is just an estimate and the actual review time can vary significantly based on various factors.
In some cases, Apple may also request additional information or revisions to the app before it can be approved. Further extended to the review process.
To help ensure a smooth review process, it is a good idea to carefully follow Apple’s guidelines and provide all necessary information and materials in your app submission.
If your app is rejected
In case, your app gets rejected make sure you made the necessary fixes before you submit your app again for review. Also, you can use the resolution center in the app store Connect to communicate with Apple about any questions you may have.
Moreover, you can escalate the issue and submit an appeal if you think your app was mistakenly rejected.
Also one of the common reasons for rejection is the “App Performance”. If you have tested your app completely and fixed all the issues, there are fewer chances of your app rejection.
You can reduce the chances of app rejection while doing Beta testing which helps your app to reduce issues related to performance. It is recommended to hire mobile app developer for submit your app to app store.
If your app is approved

Congratulation on developing an app and getting it approved for the Apple App Store! Now you can see how many people are downloading your app. And how much money you are making from sales, and what ratings and reviews your app is getting.
Here are a few steps to submit the app to the Apple app store:
- Create an iOS provisioning profile and distribution certificate.
- Then, create an App Store connect record for your app
- Next, archive and upload your app using Xcode
- Configure its metadata &other details in its App Store Connect record.
- Submit for review and check the status of your app.
Conclusion
Submitting your app to the App Store can be a complex process, but by following the steps outlined in this blog. Make sure your app meets Apple’s Guidelines and gets approved for distribution on the App Store.
If you are developing a React native app, the process is similar to submitting a traditional iOS app. And you can easily submit react native app to app store.
While the process can be challenging, it is important to remember that the App Store is a great platform for reaching a large audience. Just take enough time to carefully prepare your app for submission and increase your chances of success.
FAQs
To submit an app to the App Store, you need to have an Apple Developer Account and follow the App Store Review Guidelines. Then, you can create an app record, upload your app binary, and submit it for review.
The cost of submitting an app to the App Store is $99 per year for an Apple Developer Account.
No, it is not free to publish an app on the App Store. You need to pay an annual fee of $99 for an Apple Developer Account.
To find the best app developer for submitting your app to the App Store, you can check their portfolio, reviews, and ratings on various platforms like Clutch, Upwork, and LinkedIn. You can also ask for referrals from your network or search for app development companies that specialize in your app genre.

Niketan Sharma, CTO, Nimble AppGenie, is a tech enthusiast with more than a decade of experience in delivering high-value solutions that allow a brand to penetrate the market easily. With a strong hold on mobile app development, he is actively working to help businesses identify the potential of digital transformation by sharing insightful statistics, guides & blogs.
Table of Contents


No Comments
Comments are closed.