 Banking Software Development
 Payroll Software Development
 Our Work Process
 Awards


From idea to execution, building an app is never easy. There are different stages that you have to go through.
All these stages are highly crucial for the success of the final application. One of the key steps in the entire app development process is to build an app wireframe.
The wireframe plays a crucial role in giving your application the desired shape and giving you initial insights on how your app will look and feel.
As a business that is undergoing its digital transformation, what you need is a solution that is ready to be deployed as soon as possible.
This is also the reason why many undermine steps like building an MVP or generating a wireframe. Well, professionals from around the world suggest that you spend some time finalizing the app wireframe, as it simplifies the process.
If you are wondering what an app wireframe is and how to build one, then this is the post for you! In this one, let’s take a look at everything you need to know about an app wireframe, from the steps to build it to the benefits of create a mobile app wireframe.
Without further ado, let’s get started by understanding what an app wireframe exactly means.
What is an App Wireframe?
When planning your mobile application, you need to understand that your infrastructure is limited to your users’ mobile screens. You have to juggle multiple features and offer a simplified user experience in that square.
To ensure that you can do so without spending too much on the design and development process, you can use wireframing.
It’s like building a mock screen for the application that allows you to place all the features on the screen, giving you enough flexibility to see through things that you can add or remove depending on how the app experience looks.
Create a mobile app wireframe before getting started hardly increases your mobile app development cost, as you can even begin with a pencil and a piece of paper.
Wireframing begins as soon as an idea is conceived, as it is the first visualization that you can get. In technical terms, when a development team tries to visualize your idea, they use a 2-dimensional illustration of the frontend design, which is called a wireframe.
It is also known as the process of visualizing ideas and creating a depiction of the app’s look and basic functioning. It helps designers focus on the positioning and presentation of content, whether textual or visual, on the screen.
Understanding the Different Categories of Wireframes
Wireframes can vary based on their nature and fidelity. Different development professionals have various ways to approach building a wireframe.
It can be as simple as drawing with a pencil on paper or as complex as using expensive software to visualize the design. From this, the wireframe as a whole can be divided into three different categories.
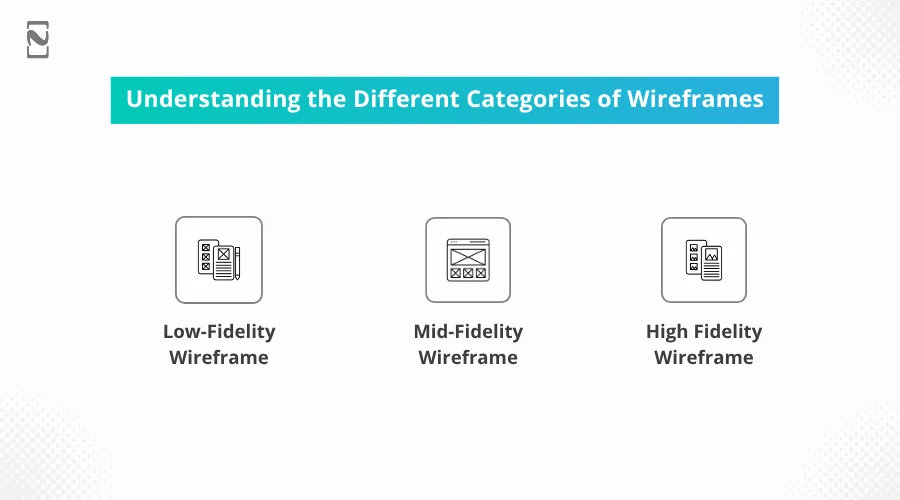
Here are the three types of wireframes that are generally executed –
► Low-Fidelity Wireframe
Low-fidelity wireframes are the simplest ones on the list. They can be created with blank paper and a pen or pencil.
In this form, the designer is just sketching the design on paper, visualizing the hierarchy of the different elements. But there are no design elements like buttons, navigation, etc, and understandably so.
In addition to this, there is no content placed here, just visual placeholders. After all, the main goal of choosing a low fidelity wireframe is creating a visualization of the idea in the minimum time and with low effort. For this reason, it is often where things started.
► Mid-Fidelity Wireframe
Taking it a step further from Low-fidelity, a mid-fidelity wireframe is what we will be discussing.
To create a low-fidelity design a bit more expressive and accurate, we add more design elements to it. These elements include buttons, navigation bars, and menus. Apart from this, mid-fidelity also includes elements like spacing between design elements, placeholder buttons, and text boxes with dummy text.
As one might guess, this gives a better insight into the design of hybrid app development. With a more accurate visual hierarchy and specifying spaces, the visualization is more accurate. Nevertheless, it doesn’t include any images or accurate content since the design is still on paper.
► High Fidelity Wireframe
As you might have already guessed, high-fidelity wireframes take things up a notch. This is by far the most interactive and sophisticated version design. Here, the designers include further elements that make the wireframe interactive as well as attractive since it is closer to the real thing.
Plus, we aren’t dealing with dummy content anymore as it has been replaced by actual content and media elements. In addition to this, we also ditch the pen and paper, as highly specific software and tools are used to create this version. The best part is, this form of a wireframe is interactive, which makes it much easier to understand.
All of them are used at different times by different groups of people. The idea behind implementing each of them is to gain more and more clarity on the final product that you are planning to build. In case you are worried about ways
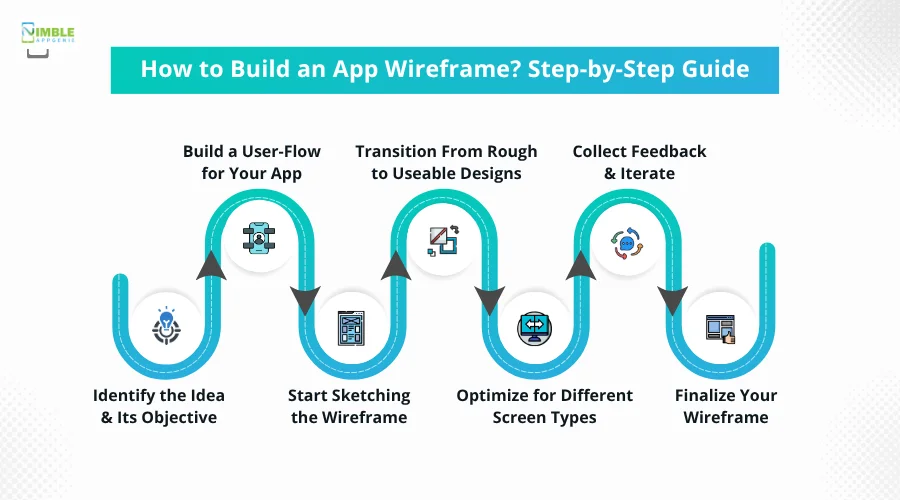
How to Build an App Wireframe? Step-by-Step Guide
Now that you are aware of the app wireframe and its types, let us take a look at the steps that are required to build one.
A wireframe, just like an MVP, is your first interaction with the application. It can often be considered a rough mobile app architecture that can be further enhanced. To do so, you need to follow a series of steps correctly.
These steps ensure that the objective is met and you have a wireframe that gets the job done.
Here are the steps –
Step 1 – Identify the Idea & Its Objective
Before you start with the wireframe, you must identify the core idea and its objective. What do you want to build, and what do you want the built application to accomplish? Once you have answers to these questions, you can easily start building the wireframe.
Step 2 – Build a User-Flow for Your App
Before you pen down the wireframe, you should start building a user flow for your application. It is also called the user journey, which simply defines the flow of how functionalities are triggered and the pages that it opens one after the other.
Step 3 – Start Sketching the Wireframe
After you have decided that you have finished identifying the flow and the objective that you are going to achieve through your app, you should pick up a pencil to start building the wireframe. Create a rough sketch of how your app will look to get an idea.
Step 4 – Transition From Rough to Useable Designs
This is the step where you transition the wireframe from rough to usable design. Take this sketching more seriously, as this is the wireframe’s foundation. Build a canvas of the smartphone screen and finish the sketching.
Step 5 – Optimize for Different Screen Types
Once you have built the wireframe, it is time to optimize your sketch according to different screens. This refers to the devices that you are planning to roll out your applications on.
If it is going to be a smartphone, the aspect ratio will be different than that of a tablet PC. Hence, you need to create a mobile app wireframe that gives insights into how the app will look on all types of devices.
Step 6 – Collect Feedback & Iterate
Share the optimized screen with the stakeholders and let them interact with it. Note all the feedback that they offer and keep iterating to build new and better versions of the wireframe. This way, you will have a more optimized version of the wireframe.
Step 7 – Finalize Your Wireframe
Present the iterated version of the wireframe and finalize it as the ultimate stepping stone for your app development process. The wireframe can help you finish the development process faster.
All these steps help you build the right wireframe for the application that you want to build. If you are not familiar with the development process, the wireframe is one of the first steps in the mobile app development checklist. You can hire a team of experts who can help you with the process, taking you one step closer to building your app.
If you have built a rough wireframe yourself, you can share it with the professional you hire, or if you want, the developers can build a wireframe for you.
How Does an App Wireframe Help in Executing an Idea?
Once you have created an app wireframe, it can help you in a lot of ways. For instance, having a wireframe helps you visualize your idea of an application.
Helping the associated designers and developers align with your vision of the final product. When executing an idea, the app wireframe does play a crucial role and gets a lot of things done.

For instance, a solid, well-built app wireframe can help you –
- Clarify the structure and functionality of your app.
- Build a well-defined user journey by identifying the flow of functionalities.
- A wireframe also serves as a common ground for communication between developers, designers, and stakeholders so that they are on the same page.
- It also offers clarity on potential usability and functionality issues that a user may come across, as per the design that you have decided to go for.
- The wireframe serves as the visual guide for the development process as it gives insights into the app’s structure and functionality, which speeds up the process and makes it easier for developers.
Create a mobile app wireframe helps the entire process in many ways. You can get a more detailed and precise approach towards building the application, as with a wireframe, you have insights on how the final developed app will look, which allows you to work in the same direction and streamline.
Get Professional Help With App Wireframes & Development
If you need help with your wireframe and app development, contact us!
At Nimble AppGenie, a leading mobile app development company, we understand how crucial it is to build an app wireframe before developing the application.
Our professional team of developers, designers, and analysts ensures that you are always in the loop in each of the development steps.
From idea to final app, the experts at Nimble AppGenie deliver the best solutions for your vision.

Conclusion
Building a mobile app wireframe simplifies the development process further, making it more and more intuitive for the users.
If you are planning to enter the market with any type of mobile app, you need to start with app market research to simplify your idea and break it down into a wireframe that will later become the user interface of your app.
The wireframe offers insight into the app’s user experience and defines the user journey flow, which is essential for any business.
Hope the steps shared in the post help you to create a mobile app wireframe easily. That will be all for this post. Thanks for reading, good luck!
FAQs
Some of the key factors to consider when designing an app wireframe include –
- Make sure you place all the functionalities in a tap-friendly zone on the screen.
- Take care of the text and visuals as mobile screens are smaller and may not hold all the information.
- Keep navigation familiar with native gestures to make the app more compatible and comfortable to use.

Niketan Sharma, CTO, Nimble AppGenie, is a tech enthusiast with more than a decade of experience in delivering high-value solutions that allow a brand to penetrate the market easily. With a strong hold on mobile app development, he is actively working to help businesses identify the potential of digital transformation by sharing insightful statistics, guides & blogs.
Table of Contents


No Comments
Comments are closed.