 Banking Software Development
 Our Work Process
 Awards


You have successfully created your mobile app, now what? First off, congrats! Developing an app takes time, effort, and lots of learning. Getting this far is a big achievement.
But there is one more step before your app can truly function, connecting it to a backend.
Most apps need to talk to a server to fetch data, send information, or interact with other services. This is done through something called an API integration.
If you are new to an API in general, fret not! It might sound complicated at first, but API integration into your mobile app is actually very doable once you break it down.
That’s exactly what this guide is for. It helps you to understand how to integrate your mobile app with an API.
So, let’s begin!
What is API Integration?
API integration means connecting two or more apps or systems so they can communicate with each other and share information using APIs.
It helps them work together smoothly, makes things faster, easier, and more automatic.
This way, users don’t have to do things manually or worry about how the systems work behind the scenes.
Besides Stripe API integration, PayPal and Square are some of the popular APIs used for apps.
In simple terms, APIs work like messengers between different apps, and when apps are set up to talk to each other using these messengers, it is known as API integration.
Major Components of API Integration
When two different applications or systems connect and share information using APIs, they rely on a few important components to make this connection work smoothly.
These main components help the systems talk to each other, send requests, get answers, and handle everything safely and correctly.
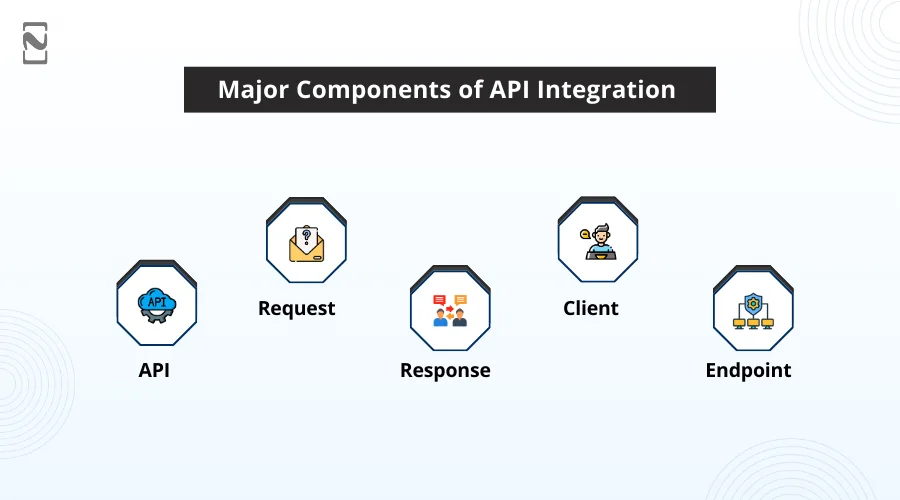
So, let’s have a look at the major API integration components.
-
API
An API, or application programming interface, is just like a set of rules or instructions that allows two applications to communicate with each other.
It tells one application how to ask for something from another app, and what kind of response to expect.
For example, you can think of it like a menu at a restaurant. It tells you what you can order and how to ask for it.
-
Request
A request is the message your mobile app sends when it wants something, like data. This could be asking for a list of users, sending payment information, or checking someone’s location.
It is like placing an order at the counter. You say, “I want this”, and wait for it to be prepared.
-
Response
A response is the answer that comes back from the system after your request. It might say, “Here is the data you asked for”, or “The action was successful,” or “Something went wrong”.
It is like receiving your food order; either you get what you asked for, or they tell you there was a problem.
-
Client
The client is the system or app that starts the communication, like it sends the request.
It could be your mobile app, a website, or any software trying to get information or send something. It is like a person who walks up to the counter and places the order.
-
Endpoint
An endpoint is the exact address on the Internet where a request is sent. Each endpoint is responsible for a specific task, like getting user details or sending a message.
It is like going to the right counter in a large store, the billing counter, the customer service desk, and so on.
What Are API Endpoints?
An endpoint is a specific URL where an API receives requests and sends back a response – think of it as one “door” into a larger system. A single API usually has many endpoints, each tied to a specific action.
For example, a payment API might have: /customers – create or retrieve customer records ; /charges – process a payment ; /refunds – issue a refund.
Each endpoint accepts particular parameters and returns a specific response format (usually JSON), documented in the provider’s API reference. When you “integrate an API,” you are actually only wiring your app to call the right endpoints, in the right order, with the right data.
Step-by-Step Process to Integrate API in Mobile App
Integrating an API into a mobile app means you’re connecting it to another service.
In this section, we’ll discuss each step clearly, so you’ll understand the process of the API integration platform for mobile apps.
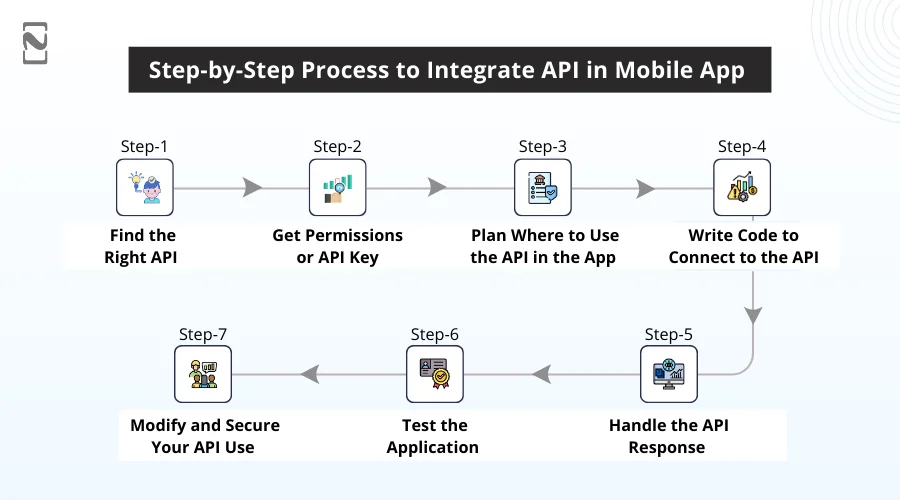
Step 1: Find the Right API
The first thing you need to do is find an API that fits your app’s requirements. For example, if your app is about movies, then look for a live streaming API, or if your app is about fintech, then look for fintech APIs.
You can search online for APIs by typing best live streaming APIs or weather APIs. When you find one, check its website. There will be a section called documentation, which is like a manual explaining how the API works.
It tells you what kind of information you can ask for and how to ask. Don’t worry if it looks confusing. Just focus on the basic parts, like what URL to use and what data you get back.
Step 2: Get Permissions or API Key
Most APIs need to have permission to use them. You can sign up on the API website and get something called an API key to integrate the API into the mobile app.
This key is a secret code that tells the API, “Hey, this user is allowed to get data”.
The API key is essential because it helps protect the API from being used too much or by people who should not use it.
Just make sure to keep this key secret. Do not share it with others or put it in places where anyone can see it.
Step 3: Plan Where to Use the API in the App
Before you start writing any code, it’s important to plan when and where your mobile app will ask the API for information.
For example, should the app fetch data right when it opens? Or only after the user clicks a button? Or maybe when you want to make a payment using something like the PayPal API?
The app sends a request to the API and waits for the response before moving forward. This means nothing else happens until the data comes back.
Planning this well helps avoid too many requests, which can slow things down or waste mobile data. It also keeps your app organized, since you know exactly when it will talk to the API and when it should wait.
Step 4: Write Code to Connect to the API
Now comes the part where you integrate the API into your mobile application.
The mobile app development services provider writes some codes that tell your app to send a message to the API’s web address, asking for data. This is called a request.
The API then sends back a response, which usually contains data in a format called JSON. It is like a list or a box of information that your app can open and read.
For example, if you are working on online payment gateway integration, this step is where your app sends payment details to the payment API and waits for a confirmation response.
To do this early, most programming languages have frameworks or libraries that manage these message exchanges for you.
You simply tell the app your API key and specify what data or action you want, and the tool handles sending the request and receiving the response.
Step 5: Handle the API Response
When your app gets the response, it has to make sense of it. This means choosing out the useful parts of the data and showing them in a way the user understands.
For example, if you asked for weather data, the app should show the temperature and maybe an icon for sunny or cloudy weather.
If the response has a lot of information, you only show what’s important. This part is like unpacking a box and choosing which things to keep on your shelf.
Sometimes the API might send back an error. Your app needs to handle this nicely. Maybe show a message like “Oops, something went wrong” so the user knows what’s happening.
Step 6: Test the Application
Testing means trying out your app to see if everything works as planned. Just test your app to see if it gets the data from the API and shows it correctly. You can try different things, like turning off the internet or using the wrong API key.
It helps to see if your app still works or shows helpful messages. Mobile app testing helps find errors early so your users do not face problems.
Step 7: Modify and Secure Your API Use
Once you successfully integrate the API into your mobile app, you need to modify it for better performance. For example, you can add messages to explain loading times or tell the user if the API data is not available.
Another important part of API integration is taking care of API security. You can keep your API key safe. Never put it in places where people can easily find it, like in public code or websites. If someone steals your key, they could use it without your permission, which might get your access blocked.
How Are APIs Built? (A Quick Overview)
If you are integrating an API, you don’t need to build one, but understanding the basics helps you read documentation faster. Most modern APIs are developed as REST APIs, meaning:
- A developer defines resources (e.g., a “user”, a “payment”) and the actions allowed on each (GET, POST, PUT, DELETE).
- Each resource gets a unique endpoint URL.
- The API returns structured data (usually JSON) in response to requests, following documented formats.
- Authentication (API keys, OAuth tokens) is layered in to control who can access which endpoints.
This is why every API you integrate – whether it’s for payments, weather, or maps – follows a similar shape once you have seen a few of them.
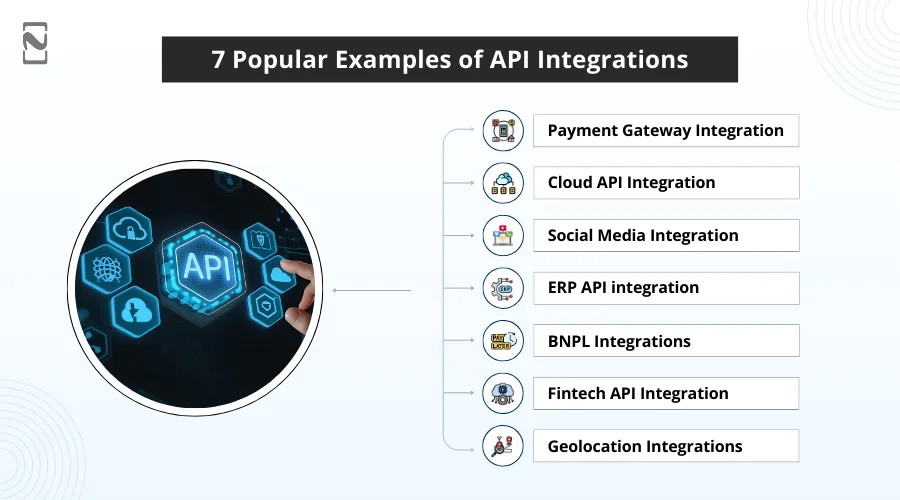
7 Popular Examples of API Integrations
APIs make it easy for apps and systems to work together. For example, they allow you to accept payments online, connect with your customer database, post to social media, and so on.
API integrations make it all work smoothly behind the scenes.
Let’s take a look at some real-world examples of mobile app API integrations.
1. Payment Gateway Integration
This is one of the most common types of third-party API integration, which means adding payment processing to an app. Since it involves sensitive customer data, security is a big deal.
That’s why many mobile app developers choose trusted payment platforms like PayPal, Stripe, etc. But Square payment gateway integration is the best among all.
These services provide secure APIs that make it easier to accept payments while following strict security standards. For example, if you want to use Google Pay in an Android app or a web app, you can implement it by using the Google Pay API.
2. Cloud API Integration
Cloud APIs allow businesses to connect their apps to big cloud services like AWS, Google Cloud, and Microsoft Azure. These connections help with things like storing files, running programs, using AI, and managing the technology to begin the scene.
For instance, if a company wants to use AWS to save and access user files in a web app, they can do this by connecting to AWS S3 using the AWS SDK and APIs.
3. Social Media Integration
Social media platforms like Facebook, Instagram, etc, offer APIs that assist apps in connecting with them easily. Developers can use these APIs to post content automatically or pull data like analytics and insights.
Marketing teams often leverage these APIs to get real-time numbers on likes, shares, comments, followers, and more. All these are shown clearly on their dashboard.
You can also use these APIs for social media integration in mobile apps, like sharing posts directly from the app or logging in. This makes an amazing user experience.
4. ERP API integration
An enterprise’s digital setup usually includes different software like CRM, ERP, and others that require sharing information and working together. ERP API integration helps connect these systems, whether custom-built or provided by the software.
So they fit into the company’s daily processes and make work very simple. For example, a custom CRM software development company can link CRM to the customer service portals using REST APIs to automatically update contact details and support tickets.
5. BNPL Integrations
BNPL integration allows mobile apps to provide payment methods that break big purchases into smaller, easier payments over time. Instead of paying all at once, customers can spread out the cost. This makes shopping less stressful.
Many stores use BNPL APIs to attract more buyers and customers to afford what they want. It is a popular way to shop without paying for everything at once.
6. Fintech API Integration
Fintech API integration helps financial apps connect with different banking, payment, and money management services. These APIs make it very easy to offer features like sending or receiving money, or tracking expenses, all in one place.
Many fintech apps also integrate eWallet APIs to allow users to store money digitally and pay quickly without hassle. This kind of integration helps create a seamless and secure financial experience for users.
7. Geolocation Integrations
Many applications use Geolocation API integration to track locations in real-time. For example, ride-sharing and delivery applications like Deliveroo connect with mapping services like Google Maps to show exactly where a driver or package is.
This kind of integration helps mobile applications to provide useful updates to users without building their own location tracking from scratch.
Why Choose Nimble AppGenie for API Integration to Your Mobile App?
Are you looking to make your mobile app smarter and more connected? Nimble AppGenie is your go-to partner for both custom API integration and API development.
That means we not only integrate your app with existing services but can also build custom APIs if you need something specific.
Our experienced mobile app development team focuses on making everything work smoothly behind the scenes, so your app performs better and users do not run into issues.
No matter if you are developing an app from scratch or modifying an existing one, we provide customized solutions that truly work.
Connect with Nimble AppGenie to get more than just technical assistance. You get a dedicated partner focused on your success.
Conclusion
Now that you know how API integration works and why it is such a valuable part of mobile app development, you can start using it to make your app smarter and faster for a better user experience.
From adding secure payments, tracking real-time locations, or offering a BNPL option, API integration solutions make it all possible without creating everything from scratch.
If you are planning for API integration into your mobile app, consider some useful APIs for your next project. For example, Stripe for secure payment, Google Maps for geolocation, Klarna for BNPL integration, and so on.
By choosing the right APIs and integrating them properly, you’ll deliver a top-notch experience that your users will love.
FAQs
- Choose the right API for your needs
- Get the API key or authentication credentials
- Read and understand the API documentation
- Write integration code for web API integration
- Handle API responses and errors properly
- Test the integration across different scenarios
- Monitor and maintain integration

Niketan Sharma, CTO, Nimble AppGenie, is a tech enthusiast with more than a decade of experience in delivering high-value solutions that allow a brand to penetrate the market easily. With a strong hold on mobile app development, he is actively working to help businesses identify the potential of digital transformation by sharing insightful statistics, guides & blogs.
Table of Contents


No Comments
Comments are closed.