 AI Services
 AI App Development
 Generative AI Development
 AI Chatbot Development
 AI Integration Services
 AI For Fintech
 AI Financial Assistant Solution
 AI Insurance Agent Development
 Tech Stack
 OpenAI / GPT-4
 Claude / Anthropic
 Gemini / Google AI
 Llama / Open Source
 LangChain / LlamaIndex
 Pinecone / Pgvector
 AWS / Azure AI

 Fintech Solution
 Fintech App Development
 Neobank App Development
 eWallet App Development
 Payment Integration
 Lending Software
 Banking Software Development
 BNPL Solution
 Insurance App
 Investment App Dev
 Wealth Management App
 Crypto & DeFi
 DeFi App Development
 Crypto Wallet Dev
 Crypto Exchange Dev
 Trading Platform Dev
 Payments
 Compliance
 Fintech & Digital Regulations
 Fraud Detection
 Lending Ecosystem
 P2P Lending Platform
 Mortgage Lending
 Engagement
 Outsourcing Dev

 Mobile Development
 Mobile App Dev
 iOS App Development
 Android App Development
 React Native
 Flutter Development
 Web Development
 Node.js Development
 React.js Development
 Angular Development
 PHP / Laravel
 App Services
 UI/UX Design
 App Maintenance
 By Stage
 MVP Development
 Industry Solutions
 Healthcare App Dev
 Education App Dev
 Travel App Dev
 Real Estate App Dev
 Logistics Software
 Social Media App

 Hire Mobile Developers
 Hire iPhone Developers
 Hire Android Developers
 Hire React Native Devs
 Hire Flutter Developers
 Hire Web Developers
 Hire Node.js Developers
 Hire Angular Developers
 Hire PHP Developers
 Hire Laravel Developers
 How It Works
 Pre-Vetted Developers
 Ready In 48 Hours
 NDA From Day One
 Replace Guarantee
 Company
 About Us
 Our Work Process
 Portfolio
 Case Studies
 Blog / Insights
 Careers
 Contact Us
 Awards
 Recognition


 Offices


Key Takeaways:
- Integrating Apple Pay in iOS apps removes checkout friction; users pay with one tap using Face ID or Touch ID, which directly reduces cart abandonment and increases completed payments.
- Apple Pay never shares the user’s real card number with you. Every transaction uses a one-time encrypted code, which means less security risk and less compliance burden on your side.
- You need three things: an Apple Developer account, a Merchant ID, and a payment processor like Stripe. Without these, the integration cannot move forward.
- The Apple Pay integration follows a clear order: create your Merchant ID, set up your certificate, enable Apple Pay in Xcode, build the payment request, and always confirm the payment on your server before fulfilling the order.
- Never skip server-side validation. Processing the payment only inside the app is a security risk. Your server must confirm every transaction with your payment processor before anything gets unlocked or shipped.
- Apple Pay integration in iOS apps typically takes 2 to 5 days for an experienced iOS developer. With the right setup and the right team, it is simple, and the impact on your conversion rate is immediate.
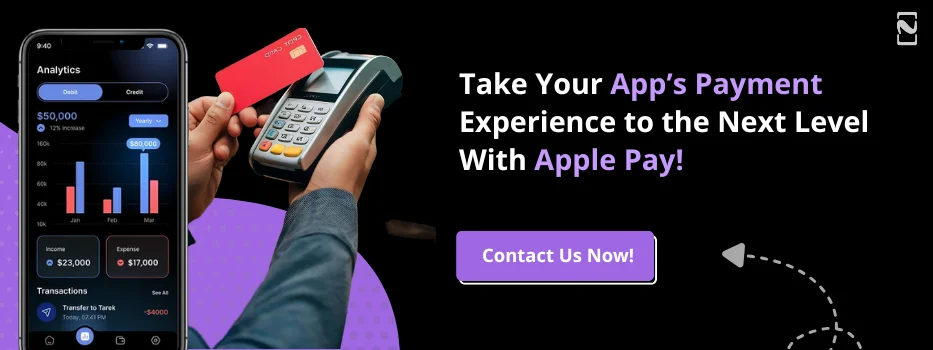
Your iOS app is ready. The features work. The design looks great. But when a user reaches the checkout screen and has to type in their card number, CVV, expiry date, and billing address, many of them just leave.
If you are an iOS developer or a product owner, integrating Apple Pay in iOS apps is the most direct fix for this. Users tap once, confirm with Face ID or Touch ID, and the payment is done. No forms. No friction. and No abandonment.
And when checkout gets that simple, people stop dropping off. Fewer abandoned carts, more completed payments, the change shows up in your numbers almost immediately.
That is exactly why more iOS apps are adding Apple Pay now, and why getting the integration right matters.
In this blog, we will take you through the complete Apple Pay integration in iOS apps process, prerequisites, setup, how each step connects, what to test, and what commonly goes wrong.
So, let’s begin!
What Is Apple Pay?
Apple Pay is a built-in digital wallet of Apple. It allows users to pay for things using their iPhone, iPad, or Mac without handing over their real card number. For example, when someone pays with Apple Pay, their real card number is never sent to you.
Instead, Apple generates a one-time code for that transaction. So, if something goes wrong on your end, there is no sensitive data to steal. That is the reason why Apple Pay is more secure than typing in a card number.
Note: Apple Pay is for real-world goods and services. If you are selling digital content inside your app, like premium features, extra lives, or a subscription, Apple needs you to use in-app purchases, not Apple Pay.
Why Adding Apple Pay to Your App Matters?
You might be thinking, Do I really need this? My app already accepts cards. Well, the answer is yes, it really matters to add Apple Pay to your app. Let’s take a look at why integrating Apple Pay in iOS apps really matters:
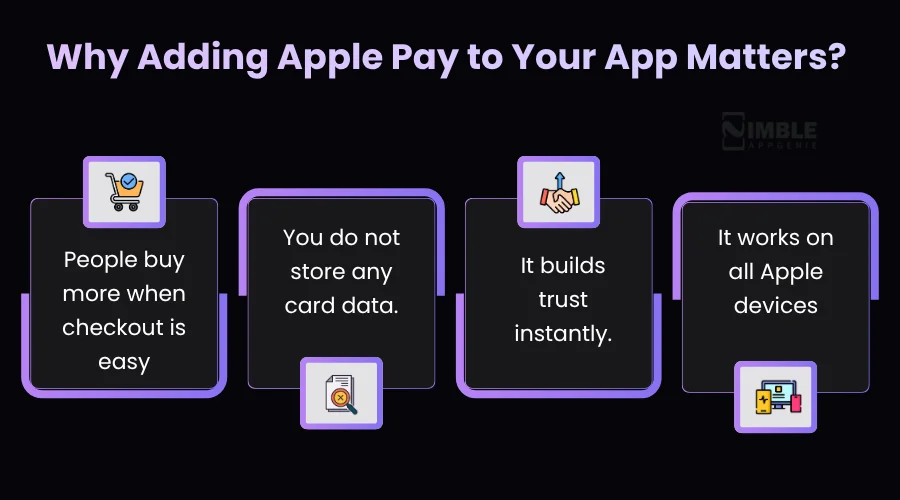
1. People buy more when checkout is easy
Cart abandonment is a major issue in mobile apps. The number one reason is the checkout process. It is too long and complicated. But Apple Pay removes that friction completely. Users who already have Apple Pay set up can pay with literally one tap.
2. You do not store any card data
This is a big one for developers and business owners. With Apple Pay, you can never touch the actual card number. That massively reduces your responsibility under PCI DSS compliance rules. It is less liable and less complex.
3. It builds trust instantly
The Apple Pay button is one of the most recognized payment icons in the world. When a user sees it, they know it is really safe. That brand trust transfers directly to your mobile application.
4. It works on all Apple devices.s
One Apple Pay integration covers iPhone, iPad, Apple Watch, and Mac. Your users get a consistent experience everywhere.
By the Numbers: Apple Pay is used by 785M+ people in the world. It ranks in the top 3 mobile payment applications by users. iOS users generate higher in-app revenue than Android users. This makes Apple Pay a high-value addition to any iOS app.
Prerequisites: What You Need Before You Start?
Before you write a single line of code, just make sure you have these things ready. If you skip any of these prerequisites, it will block you later. Take a look:
- Apple Developer Program accounts can be used by individuals or organisations. Enterprise accounts cannot use Apple Pay.
- You need Xcode 15+ with a physical iPhone or iPad for testing. The simulator does not support the full Apple Pay flow.
- A Payment Processor is very necessary. Stripe is the simplest option. Braintree and Adyen are solid alternatives. Your processor manages the actual charge after Apple gives you the token.
- A Backend Server, even a minimal one is required. You need it for server-side token validation. Never process Apple Pay payments client-side only.
- The most important thing is an SSL Certificate. All communication between your app and server must go over HTTPS.
How to Integrate Apple Pay in iOS Apps?
Integrating Apple Pay in iOS apps is a challenging task. You have to follow a proper roadmap to handle setup, iOS app security checks, and smooth payment flow without errors. In this section, we will check out the process of adding Apple Pay to the iOS app.
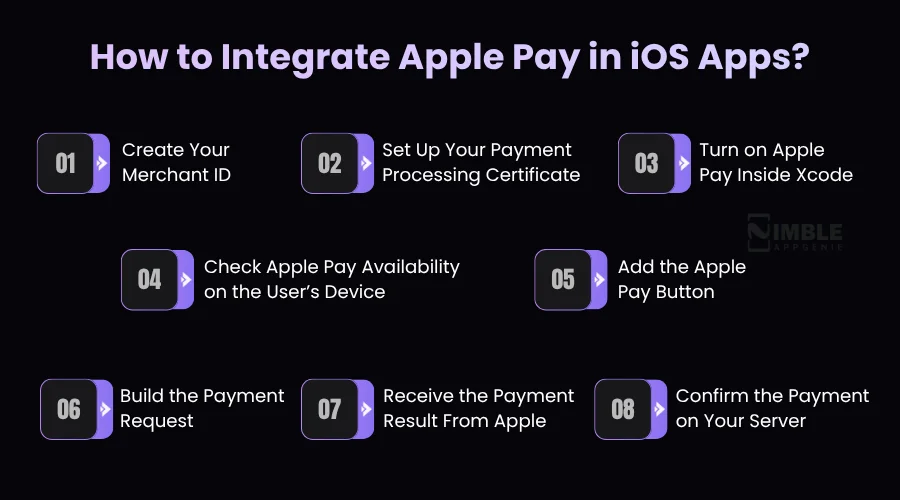
1. Create Your Merchant ID
Your Merchant ID is basically your business’s unique identity inside Apple’s payment system. It tells Apple that your app is authorised to accept payments.
Now, to create one, just follow this. Login into your Apple developer account, go to Certificates, Identifiers & Profiles, click on Identifiers, hit the + button, and choose Merchant IDs from the list.
You can give it a name and an identifier. The ideal format to follow is something like: merchant.com.yourcompanyname.appname. This keeps things organized if you manage multiple apps. Once registered, your Merchant ID is permanent. It never expires.
2. Set Up Your Payment Processing Certificate
This certificate is what keeps payment data secure between Apple and your payment processor. If you are using Stripe, just go to your Stripe dashboard, head to settings, find the Apple Pay section, and click Add New App.
Strip takes you through the certification setup step-by-step. They manage most of the complexity for you. If you are not using Stripe, you will generate a certificate request file from your Mac, upload it to Apple’s developer portal under your Merchant ID.
Now download the resulting certificate, and give it to your payment processor or install it on your server. You can only use each certificate request file once. If you switch payment processors or your certificate expires, you will need to make a new one from scratch.
3. Turn on Apple Pay Inside Xcode
Xcode is the application where you develop an iOS app. This step tells Xcode and Apple that your app is allowed to use Apple Pay. Open your project in Xcode, click on your app’s name at the top of the file list, and go to the Signing & Capabilities tab.
Now hit the + Capability button. You can search for Apple Pay and add it. A dropdown will appear that shows your Merchant IDs. Just select the one you created in Step 1. Xcode automatically updates the permission files in your project.
You do not have to touch anything manually. That’s it for integrating Apple Pay in iOS apps. Your project is now linked to your Merchant ID, and Apple Pay is officially enabled.
4. Check Apple Pay Availability on the User’s Device
Not every user will have Apple Pay set up. Some have not added a card to their wallet. Some are in regions with limited support, while some are older devices.
Before you show the Apple Pay button to anyone, your iOS app needs to check whether it will actually work for that particular user on that specific device.
If Apple Pay is available, show the Apple Pay button. If it is not, show your regular card payment instead. Now, remove all payment gateways just because Apple Pay is not available. That would leave some users with no way to pay at all.
This check is a single line of logic in your code. But it is one of the most important things to get right before going live.
5. Add the Apple Pay Button
Apple is strict about the look of the Apple Pay button. You must use their official button. You cannot design your own or make it look different from Apple’s version. Applications that use custom-designed buttons get rejected from the App Store.
Apple provides you with many button label options based on what the user is doing. For example, buy with Apple Pay for a one-off purchase, and subscribe with Apple Pay for recurring plans.
Book with Apple Pay for reservations, donate with Apple Pay for charitable giving. You should always choose the label that matches what the user is actually doing. Where you place the button also matters.
You should put it prominently on the product page, in the cart, and at checkout. The earlier users see it in the flow, the more likely they are to use it. Do not hide it at the bottom below five other options.
6. Build the Payment Request
When a user clicks the Apple Pay button, your iOS app needs to tell Apple what is being purchased. This is called a payment request. You set the price, the currency, the country, and which card networks your app accepts. Additionally, you add a line-by-line summary of what the user is buying.
For example, the premium plan-$19.99, plus the total at the bottom. That summary is what appears on the Apple Pay sheet the user sees before confirming. It should be clear and accurate. If the numbers do not add up correctly, Apple will flag it.
Once the request is ready, you present Apple’s payment sheet to the user. Apple manages everything from there. It shows their saved cards, asks for Face ID or Touch ID, and returns the result to your app. You do not build any of that yourself.
7. Receive the Payment Result From Apple
Once the user approves the payment with their face or fingerprint, Apple sends your app a payment token. This token is an encrypted package that represents the transaction.
It does not contain the user’s actual card number. Your app gets this token automatically through a delegate method, a piece of your code that Apple calls when the payment sheet is done.
At this point, you take that token and immediately pass it to your backend server. Do not try to process or confirm the payment directly inside the app. The token is encrypted and can only be properly handled server-side.
You then tell Apple whether the payment was successful or not. Apple uses that response to show the user a confirmation screen or an error.
8. Confirm the Payment on Your Server
It is the step that separates a secure integration from an insecure one. And it is the step most quick-start tutorials either skip or barely mention. When your app receives the payment token from Apple, it sends it to your backend server over a secure connection.
Your server then passes that token to your payment processor, like Stripe, Braintree, or whoever you are using. The processor decrypts it and actually charges the card.
Only after your server gets a confirmed success response from the payment processor should you fulfil the order, unlock the feature, ship the product, and activate the subscription.
You should never assume the payment went through just because Apple closed the payment sheet. Also, you must always wait for your server to confirm it. This server step protects you against fraud.
Token tampering is a known attack vector. If you skip server-side validation, you are leaving a door open that does not need to be open.
Never Skip Server-Side Validation: Processing Apple Pay only on the client side is a major security mistake. Token tampering and replay attacks are real. Your server must confirm the charge with the payment processor before you fulfil the order.
How to Test Your Apple Pay Integration in an iOS App?
Testing Apple Pay on a real device is quite mandatory. The iOS simulator cannot simulate Face ID or Touch ID, so the full payment flow would not work. Below is the process to test Apple Pay Integration:
- Go to App Store Connect – Users and Access – Sandbox Testers – create a new sandbox account.
- On your physical iPhone, sign out of your regular Apple ID in settings – App Store (not your main Apple ID)
- Sign in to the sandbox Apple ID in the App Store section only
- In wallet, add a test card – Apple offers test card numbers in their developer documentation (search ‘Apple Pay sandbox testing cards’)
- Run your app on the device via Xcode and trigger a payment.
- Test scenarios like successful payment, declined card, user cancels, and network timeout.
Test Edge Cases Too: Many iOS developers only test the happy path. Just make sure you test: what happens when the user cancels mid-payment, what happens when the server returns an error, and what happens on a device where Apple Pay is not set up. These edge cases matter for App Store review.
Common Mistakes While Integrating Apple Pay in iOS Apps and How to Fix Them
These are the most common problems developers run into when integrating Apple Pay into iOS apps. Also, we have jotted down the solutions to fix them. Take a look:
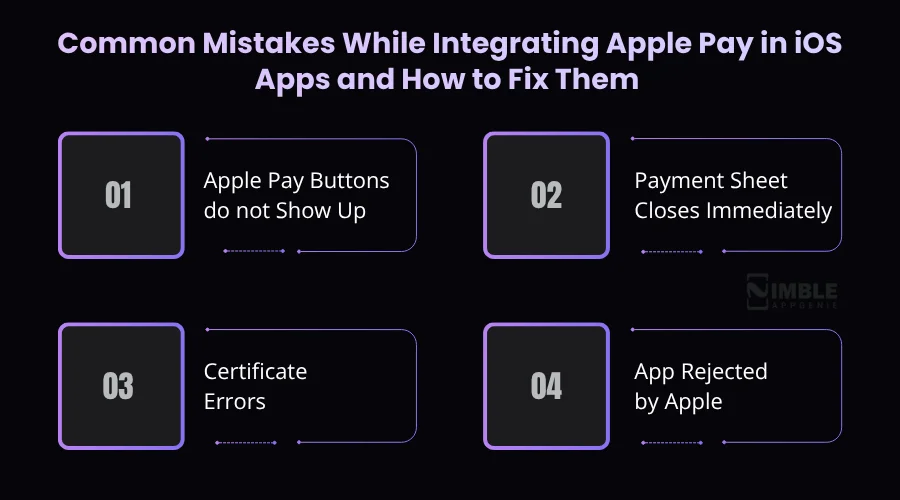
1. Apple Pay Buttons do not Show Up
It usually means either your Merchant ID is not set correctly in Xcode, or the device does not support Apple Pay.
Solution:
You should always run the canMakePayments() check first, and double-check that your Merchant ID in Xcode matches exactly what is in your Apple Developer Account.
2. Payment Sheet Closes Immediately
Almost always a Merchant ID mismatch.
Solution:
The ID in your app’s entitlements file does not match what is registered in your developer account. You can go back and compare them character by character.
3. Certificate Errors
One certificate Signing Request file can only be used once. If you try to reuse it, you will get an error.
Solution:
You should generate a new CSR every time you need a new certificate.
4. App Rejected by Apple
The most common cause is a custom-designed payment button.
Solution:
Apple needs you to use their official PKPaymentButton. Any custom button, even if it looks similar, will get your app rejected.
How Nimble AppGenie Can Integrate Apple Pay in iOS Apps?
Integrating Apple Pay in iOS apps sounds so easy, and with the right iOS app development company, it is. But there are a lot of minute things that can go wrong, like a mismatched Merchant ID, etc. These issues do not always show up during development. Sometimes they only appear when you are live.
That is where Nimble AppGenie comes in. We have integrated Apple Pay into iOS apps on e-commerce, healthcare, and on-demand platforms. We know exactly where the process gets challenging, and we know how to get it right the first time.
When you work with us, we manage everything. The Apple developer setup, the payment processor configuration, the in-app implementation, and a full round of testing. You get a secure Apple Pay integration that passes App Store review.
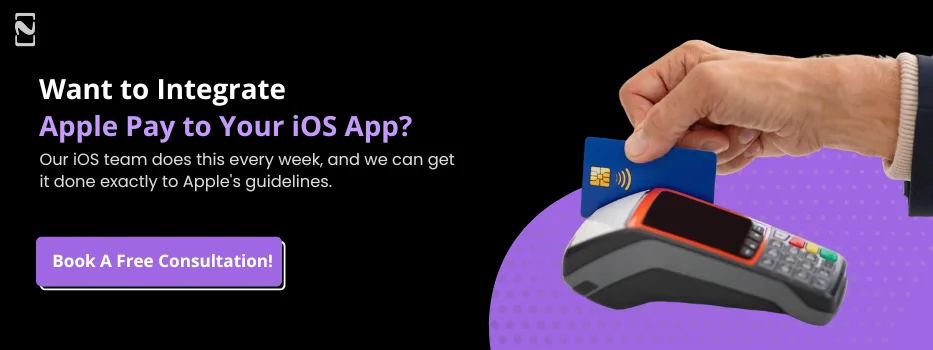
Want Apple Pay in your iOS app? We can assist you! Just book a free consultation!
Conclusion
Apple Pay is one of the smartest things you can add to an iOS app that manages payments. Users get a faster checkout. You get fewer abandoned orders. And everyone gets a safer transaction with no card number stored.
The setup has a few moving parts, but none of them are complicated when you know what you are doing. Create a Merchant ID, setup certificate, enable Apple Pay in Xcode, and ensure the server confirms every payment before you fulfil the order.
Just follow those steps for integrating Apple Pay in iOS apps, and you will have it working. No matter if you are creating this yourself or hiring a dedicated development team, now you know exactly what is involved. And if you want it done right the first time, we are just one step away.
FAQs

Rahul leads the iOS development team at Nimble AppGenie, with a sharp focus on high-performance mobile applications and cutting-edge user interfaces. He specializes in creating intuitive, friction-free experiences for millions of end-users and is committed to pushing the boundaries of what is possible within the Apple ecosystem. When he’s not coding, he enjoys playing badminton, exploring new places, and finding his peace playing cricket on the weekends.
Table of Contents
No Comments
Comments are closed.